 (0)
(0)Ground Preparation and Fertilization
Groundcovers are capable of giving long lasting beauty and function, but their performance is only as good as the effort one puts into soil preparation (fertilization can also have a dramatic effect on the performance of your plants).Step 1: Soil Preparation
The best way to improve soil is to add organic matter such as peat, compost or manure at a rate of 25-35% by volume into the planting area. If your soil is heavy clay, the addition of organic matter improves both drainage and aeration and also allows better root development. Liberal amounts of organic matter help sandy soil hold water and nutrients. Finely ground pine bark is also good.
Spread a 2 to 4 inch layer of organic material over the garden surface and plow, spade or till the top 6-12" when the soil is not too wet (to test, pick up a handful of soil and squeeze it - if it stays in a ball it is too wet, if it crumbles freely, it should be about right). If you are tilling the area for the first time, till half the depth on the first pass and the remaining depth on a second pass.
|
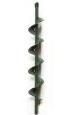
If you elect not to till, you can dig individual holes and fill under and around the plant with soil enriched as above. If you have many holes to dig (especially if you have rocky or compacted soil), consider using a plant auger - it can save you huge amounts of time and effort.
Many augers can be operated in regular drills (check the product description to see what size drill is needed: 1/4", 3/8", ...).
Bare root plants would be happiest with a 3" hole (2 3/4" or even 2 1/2" is OK if that is all you can get).
Potted plants do best in a hole that is twice as wide as the pot, this means either a large auger (that might require renting a power landscaping auger) or you use a smaller auger and manually enlarge the hole after drilling.
Many garden centers carry augers or they are readily available
online |
|
Consider testing the pH and perhaps magnesium, phosphorus and potassium levels of your soil and adjusting as needed during the tilling step. It's WAY more important to the health and growth rate of plants than most people realize. [more information on pH]
Step 2: Soil Fertilization
For maximum growth fertilizing is essential. Use the following chart for guidance.
| WHEN | WHAT TYPE | FREQUENCY |
| When you plant | Complete Fertilizer: 10-10-10 | One time |
| Early spring to late summer | High Nitrogen: 16-4-8 | Every 4-6 weeks |
| Early fall to winter | Complete Fertilizer: 10-10-10 | HALF the manufacturer's recommended rate |
After fertilizing, water the plants to wash fertilizer from foliage and avoid any burning of new growth. Avoid over-fertilizing, it can burn or even kill your plants. Fast growing plants and plants that produce an abundance of blooms can benefit from more fertilizer. [more information on fertilization]
Step 3: Weed Control
For best results, incorporate a pre-emergent weed control herbicide into the planting area. Check the label instructions for the brand you choose to confirm its applicability with the groundcover you are planting. Applying a 2-4" heavy top mulch will greatly assist weed prevention, erosion control and increase moisture retention (if you are planting something that spreads by runners, use less mulch so the rootlets can reach the ground to re-root).
If you'd like to reduce your frequency of watering and risk of drought damage, consider adding Horticultural Grade Terra-Sorb

Terra-Sorb (or generic water absorbing crystals) is available at many garden supply stores and online in quantities ranging from 3 ounces to 40 pounds See Terra-sorb's Product Directions and Material Safety Data Sheet | 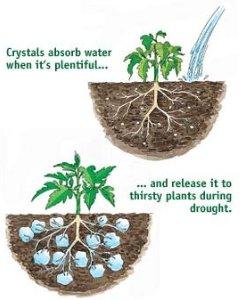 |
Note: people have a tendency to use too much, sometimes to the point where the expansion is so great that the plants pop out of the ground! The simplest way to avoid this is to put some of the crystals in a bucket, add water, wait 10 minutes so they expand, and then add them to the soil. This way they can only expand back to their current size and the plants will stay put. Do not worry about adding too much water, you can scoop them up like chunks of jello off the bottom.
See also:
Planting instructions
More information on fertilization
Testing and adjusting the pH of your soil
Plant Calculator